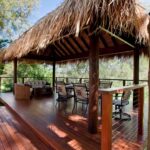
Installing a gazebo can enhance your outdoor space, providing an inviting area for relaxation and entertainment. Whether you’re creating a cozy garden retreat or a spacious area for outdoor gatherings, the following guide will walk you through the installation process step-by-step.
Tools and Materials Needed
Before you begin, gather the following tools and materials:
- Tools:
- Tape measure
- Level
- Hammer
- Power drill and drill bits
- Screwdriver
- Wrench
- Shovel
- Spirit level
- Safety goggles
- Work gloves
- Materials:
- Gazebo kit (check for all included parts)
- Concrete or paving stones (if anchoring)
- Wood frame or posts (if you’re building from scratch)
- Fasteners and connectors
- Landscaping fabric (optional)
Preparation Steps
- Choose the Right Location:
- Select a flat area in your yard that is spacious enough to accommodate the gazebo and offers some shade. Avoid low spots that collect water.
- Check Local Regulations:
- Review local building codes to ensure compliance, including permits needed for construction.
- Gather Your Team:
- While some gazebos can be installed solo, having a partner can make the process smoother, especially when lifting and securing parts.
- Prepare the Ground:
- Clear the area of grass, rocks, and debris. Level the ground as much as possible.
- If using a foundation, outline the gazebo size with stakes and string. Excavate according to the size and depth required (typically around 4-6 inches).
Installation Steps
- Set the Base:
- For concrete bases:
- Mix and pour concrete into the excavation, using a level to ensure it’s even.
- Allow the concrete to cure for the necessary time indicated by the manufacturer.
- For paving stones:
- Lay down landscaping fabric and add a layer of gravel for drainage.
- Position the paving stones in the outlined area.
- Assemble the Frame:
- Start with the floor frame, if included. Use the power drill to secure the pieces according to the instructions provided with your kit.
- Ensure all corners are square by measuring diagonally from corner to corner.
- Install the Poles:
- Attach vertical posts to each corner of the frame. Make sure they are plumb (vertically straight) using the spirit level.
- Temporarily brace the posts for support.
- Add Roof Beams:
- Follow the kit instructions to attach the roof beams, which will tie the vertical posts together. Secure them for stability.
- Install the Roof:
- Add the roof panels or shingles according to your gazebo design.
- Ensure the roof slants slightly for water drainage.
- Anchor the Gazebo:
- If your gazebo is freestanding, anchor it to the ground using brackets or stakes, especially in windy areas.
- For added stability, fill in the surrounding areas with gravel or soil.
Finishing Touches
- Paint or Stain:
- If your gazebo is wood, consider applying a weatherproof stain or paint to protect against the elements.
- Add Accessories:
- Install lighting, ceiling fans, or curtains for added comfort and style.
Maintenance Tips
- Regularly check for loose screws or bolts, and tighten them as needed.
- Clean gutters and remove debris from the roof to prevent water damage.
- Inspect wooden gazebos for signs of rot or termite damage, and treat as necessary.
Installing your gazebo can transform your outdoor space, providing a functional and aesthetic area for relaxation or entertaining guests. By following these steps and ensuring regular maintenance, you can enjoy your gazebo for many years to come.
If you’re considering a gazebo installation and would like assistance or a quote, feel free to contact us via our contact page at East Coast Bali Huts and Gazebos.